How to Unlock a LUKS-Encrypted Root Over SSH on Fedora and RHEL
In this article, use dracut-sshd on Fedora and RHEL to SSH into the initramfs and unlock a LUKS-encrypted root remotely, with no console trip needed.
An encrypted server that reboots in a remote rack stops at a passphrase prompt that nobody can see. Here's how to add SSH and networking to the initramfs with dracut-sshd and NetworkManager, so you can unlock it from your own terminal.
If you encrypt the root filesystem of a server in a data centre, a branch office, or a customer's closet, you have probably noticed that every reboot becomes a small problem.
A kernel update, a power cut, or planned maintenance all end the same way, with the machine waiting at a LUKS passphrase prompt on a console you cannot reach while your SSH session quietly times out.
Most admins end up driving to the machine or struggling with a slow remote management console such as IPMI or iDRAC, and some give up and leave the disk unencrypted, which throws away the protection they wanted in the first place.
There is a much simpler way to handle this on Fedora and RHEL, because the tools needed are already packaged and only need to be switched on.
That solution is dracut-sshd, which puts the OpenSSH server inside the initramfs, the small temporary root filesystem that Linux loads before the real root disk is mounted.
Together with dracut's NetworkManager module, it lets the server bring up its network card early in the boot, start sshd, and wait for you to log in and type the passphrase, just as you would at the physical console.
How dracut-sshd Unlocks LUKS in the initramfs
On Fedora and RHEL systems, the initramfs is built with dracut, which assembles the early boot environment from small modules, where each module handles a specific part of the boot process, such as discovering storage devices, unlocking LUKS volumes, or bringing up the network.
The dracut-sshd package adds an sshd module that places the SSH server and the required authentication files inside the initramfs, which allows an SSH server to run before the encrypted root filesystem has been unlocked.
Once everything is configured, the boot process works roughly like this:
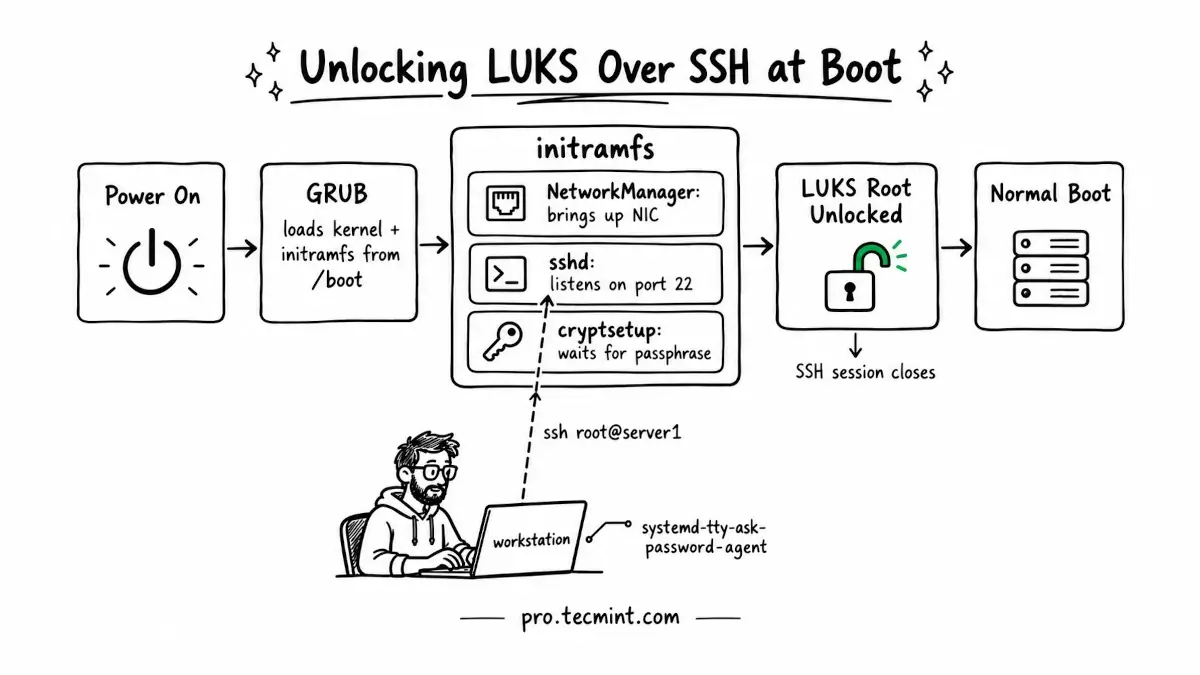
As you can see in the diagram, the network has to come up before sshd is of any use, and this is the part that surprises most people.
dracut normally starts networking in the initramfs only when the root filesystem lives on the network, such as iSCSI or NFS, so on a server with a local disk it never bothers.
The kernel argument rd.neednet=1 tells dracut that networking is required anyway, which creates a flag file at /run/NetworkManager/initrd/neednet, and dracut's nm-initrd.service only runs when that file exists.
The unlock itself happens through systemd-tty-ask-password-agent, the same tool systemd uses behind the scenes to show passphrase prompts on the console.
When you run it over SSH, it finds the pending LUKS request and hands your passphrase to systemd-cryptsetup, which then unlocks the disk and lets the boot continue.
To make all of this work, we will touch only a handful of files on the server:
/etc/dracut.conf.d/90-nm-initrd.conf        enables the network-manager dracut module
/etc/ssh/dracut_ssh_host_ed25519_key        dedicated host key for the initramfs sshd
/root/.ssh/dracut_authorized_keys           public key allowed to log in during boot
/usr/lib/dracut/modules.d/46sshd/           the dracut-sshd module itself
Throughout the guide, we will work with two machines, a workstation where you type the passphrase and an encrypted server that needs unlocking:
| Hostname | IP Address | Role | Notes |
|---|---|---|---|
| workstation.tecmint.lan | 192.168.56.10 | Admin client | Where you type the passphrase |
| server1.tecmint.lan | 192.168.56.20 | Encrypted server | Fedora or RHEL 10 with a LUKS root |
The workstation only needs an SSH client, so almost everything that follows happens on server1, which already has a LUKS-encrypted root created by the installer.
Prerequisites
Before you start, make sure you have:
- A Fedora or RHEL system (Rocky Linux and AlmaLinux work the same way) with a LUKS-encrypted root created by the installer.
- A wired network connection. Wi-Fi in the initramfs is possible but far more fragile, so this guide sticks to Ethernet.
- Console access to the server for your first test reboot, because a mistake here can leave the server stuck at a prompt you cannot reach.
sudoaccess on the server with thetecmintuser.
Install dracut-sshd on Fedora and RHEL
Now that the server is ready, the first step is installing dracut-sshd itself. Where the package comes from depends on the distribution, so pick the block that matches your system.
On Fedora, the package is available in the default repositories, so a single command is enough:
sudo dnf install -y dracut-sshd
On RHEL 10, the package comes from the EPEL (Extra Packages for Enterprise Linux) repository, which in turn needs the CRB (CodeReady Builder) repository enabled:
sudo subscription-manager repos --enable codeready-builder-for-rhel-10-$(arch)-rpms
sudo dnf install -y https://dl.fedoraproject.org/pub/epel/epel-release-latest-10.noarch.rpm
sudo dnf install -y dracut-sshd
On Rocky Linux 10 and AlmaLinux 10, CRB is already defined, so you only need to switch it on:
sudo dnf config-manager --set-enabled crb
sudo dnf install -y epel-release
sudo dnf install -y dracut-sshd
Whichever route you took, the package should also have been pulled in dracut-network as a dependency, and it's worth confirming both are present before moving on:
rpm -q dracut-sshd dracut-network
Output:
dracut-sshd-0.7.1-3.el10_2.noarch
dracut-network-107-3.el10.x86_64
Enable Networking in the initramfs
At this point the SSH server is ready to go into the initramfs, but it would have no network to listen on, so the next job is telling dracut to include its NetworkManager module.
You can do that with a small config file:
echo 'add_dracutmodules+=" network-manager "' | sudo tee /etc/dracut.conf.d/90-nm-initrd.conf
Next, add kernel arguments to enable networking and request an address over DHCP using the grubby tool, which edits the boot entries directly, which is the recommended method on Fedora and RHEL because both use Boot Loader Specification (BLS) entries:
sudo grubby --update-kernel=ALL --args="rd.neednet=1 ip=dhcp"
Once that is done, check the default entry to confirm the new arguments were added:
sudo grubby --info=DEFAULT | grep args
Output:
args="ro rd.luks.uuid=luks-ffe26397-d8be-4f20-99d6-a899886f1169 rhgb quiet rd.neednet=1 ip=dhcp"
The earlier part of the line will look different on your system, since it depends on how the server was installed, so the thing to look for is rd.neednet=1 ip=dhcp at the end.
Create Dedicated SSH Keys for the Unlock Step
With networking sorted out, let's decide which keys the initramfs will use. If you give dracut-sshd nothing, it falls back to your existing /root/.ssh/authorized_keys and the server's normal host keys.
That works, but it places a copy of your real host key on the unencrypted /boot partition, where anyone holding the disk could read it and impersonate your running server.
For that reason, we will give the initramfs its own host key and its own login key. On server1, generate the dedicated host key first:
sudo ssh-keygen -t ed25519 -N "" -f /etc/ssh/dracut_ssh_host_ed25519_key
Next, switch to workstation and create a key that you will only ever use for unlocking this server, then copy its public half across:
ssh-keygen -t ed25519 -f ~/.ssh/server1_unlock -C "server1 initramfs unlock"
scp ~/.ssh/server1_unlock.pub [email protected]:/tmp/
Back on server1, move that public key into the file dracut-sshd checks first, with permissions that SSH will accept:
sudo install -d -m 700 /root/.ssh
sudo install -m 600 /tmp/server1_unlock.pub /root/.ssh/dracut_authorized_keys
rm /tmp/server1_unlock.pub
Keeping the unlock key separate from your everyday admin key means you can revoke boot-time access without touching normal logins, which becomes important if the key is ever shared with a colleague or an on-call rota.
Rebuild and Inspect the initramfs
None of the changes so far affect the boot until they are written into the initramfs, so the next step is rebuilding it.
We will rebuild the image for every installed kernel, which means that falling back to an older kernel from the GRUB menu still gives you SSH access:
sudo dracut -f --regenerate-all
Before rebooting, it's a good idea to confirm the new image really contains the modules we need, since a missing module only shows up later as a server that never answers:
sudo lsinitrd -m | grep -E '^(sshd|network-manager|crypt)$'
Output:
crypt
network-manager
sshd
If sshd or network-manager is missing from this list, check the config file name and its contents, then run the rebuild again. Once the modules are there, confirm that the keys were copied in as well:
sudo lsinitrd | grep -E 'dracut_ssh_host|authorized_keys'
You should see the dedicated host key and an authorized_keys file in the listing. If authorized_keys is missing, dracut-sshd did not find any key file to copy, and every login attempt during boot will end with Permission denied (publickey).
Example 1: Unlock the LUKS Root After a Routine Reboot
Now that the initramfs is ready, there's one small thing to set up on the workstation before the first reboot.
The initramfs answers on the same IP address as the running server but presents a different host key, so a plain ssh [email protected] would trigger a host key warning every time you unlock. You can avoid that by giving the initramfs its own entry in your SSH config.
On the workstation, add this block:
cat << 'EOF' >> ~/.ssh/config

# ~/.ssh/config
Host server1-unlock
    HostName 192.168.56.20
    User root
    IdentityFile ~/.ssh/server1_unlock
    IdentitiesOnly yes
    HostKeyAlias server1-initramfs
EOF
The HostKeyAlias line tells SSH to store and check this host key under the name server1-initramfs instead of the IP address, so it never clashes with the key saved for your normal [email protected] logins.
With the alias in place, reboot the server while you still have console access for this first test:
sudo systemctl reboot
Give it 20 to 30 seconds to reach the passphrase prompt, and then connect from the workstation using the alias:
ssh server1-unlock
Output:
Welcome to the early boot SSH environment. You may type

    systemd-tty-ask-password-agent

(or press "arrow up") to unlock your disks.

initramfs-ssh:/root#
SSH will ask you to accept the host key on this first connection, which is expected since it's a new key. Once you are at the prompt, run the password agent and type your LUKS passphrase:
systemd-tty-ask-password-agent
Output:
🔐 Please enter passphrase for disk luks-ffe26397-d8be-4f20-99d6-a899886f1169:
(press TAB for no echo) •••••••••••
Connection to 192.168.56.20 closed by remote host.
The connection closing right after the passphrase is actually the sign that everything worked.
Example 2: Use a Static IP Address in the initramfs
The first example relied on DHCP, but many server networks don't run a DHCP server at all, and in that case the initramfs would sit waiting for a lease that never arrives.
The fix is to replace ip=dhcp with a static address, which uses the format client-ip:peer:gateway:netmask:hostname:interface:method.
Because the static form needs the interface name, find it first. The initramfs uses the same predictable names as the running system, so whatever you see here is what the kernel will see during boot:
ip -br linkOutput:
lo               UNKNOWN        00:00:00:00:00:00 <LOOPBACK,UP,LOWER_UP>
enp1s0           UP             52:54:00:3a:91:c2 <BROADCAST,MULTICAST,UP,LOWER_UP>
With enp1s0 identified, you can remove the DHCP argument and add the static one in the same grubby command:
sudo grubby --update-kernel=ALL --remove-args="ip=dhcp" \
  --args="ip=192.168.56.20::192.168.56.1:255.255.255.0:server1:enp1s0:none nameserver=192.168.56.1"
The peer field is empty because it is only used on point-to-point links, and the method is none because we are supplying the address ourselves.
Take care with that last field, since NetworkManager's parser treats an empty or misspelled method as auto without reporting an error, which means a small typo quietly turns your static setup back into DHCP.
Unlike the key changes earlier, this one doesn't need an initramfs rebuild, because kernel arguments are read at boot time and aren't stored inside the image.
Example 3: Limit the Unlock Key to the Unlock Command
So far, anyone holding server1_unlock gets a full root shell inside the initramfs, which is much more access than a key meant for typing a passphrase should have.
OpenSSH lets you attach restrictions to individual keys in authorized_keys, so we can force every login with this key to run the password agent and nothing else.
On server1, open the key file and add the options in front of the existing key:
cat << 'EOF' >> /root/.ssh/dracut_authorized_keys

# /root/.ssh/dracut_authorized_keys
restrict,pty,command="/usr/bin/systemd-tty-ask-password-agent" ssh-ed25519 AAAAC3Nza...your-key... server1 initramfs unlock
EOF
The restrict option turns off port forwarding, agent forwarding, and X11 forwarding in one go.
Since the password agent needs a terminal to read your passphrase, pty switches terminal allocation back on, and command= then makes SSH run the agent no matter what the client asks for.
As with the keys earlier, this file only takes effect once it's copied into the image, so rebuild the initramfs after saving it:
sudo dracut -f --regenerate-allOn the next reboot, ssh server1-unlock takes you straight to the passphrase prompt without ever showing a shell, which is exactly what you want from a key that might live on several people's laptops.
Example 4: Test What Happens Without rd.neednet=1
Now that the setup is working and locked down, it's worth breaking it once on purpose while you still have console access, so that you'll recognise the symptom if it ever happens on a remote machine.
At the GRUB menu, press e on the default entry, delete rd.neednet=1 from the linux line, and press Ctrl+x to boot with the edited line.
When the server reaches the passphrase prompt, try connecting from the workstation the same way as before:
ssh server1-unlockOutput:
ssh: connect to host 192.168.56.20 port 22: No route to hostDepending on your network, you may see Connection timed out instead. What makes this failure confusing is that the boot log shows nothing wrong, because without the flag file nm-initrd.service is skipped rather than failed, and systemd doesn't treat a skipped unit as an error.
Type the passphrase on the console to finish this boot. The GRUB edit only lasts for a single boot, so the next reboot goes back to the saved arguments.
For comparison, when the setup is working, you can log in and confirm both the flag file and the active connection from inside the initramfs before unlocking:
ls /run/NetworkManager/initrd/
nmcli -t -f NAME,DEVICE,STATE con showOutput:
neednet
Wired Connection:enp1s0:activated
lo:lo:activated
If the flag file is present and the interface shows activated, the network side is healthy, and any remaining login problem is almost always about keys.
Summary
You now have an encrypted Fedora or RHEL server that starts SSH during early boot, so a reboot no longer means a trip to the console just to type a passphrase.
With a dedicated host key, a restricted unlock key, and a separate known_hosts entry, the setup stays convenient without quietly weakening your disk encryption.
If you'd like to go deeper into key management, authorized_keys options, SSH config patterns like HostKeyAlias, and server hardening, our SSH Course covers all of it across 54 chapters, and it's a natural next step for managing setups like this one across many servers.
We'd love to hear how you handle encrypted servers in your own environment.
Do you unlock over SSH, use Clevis and Tang (open-source components used together for Network-Bound Disk Encryption (NBDE) to automatically unlock encrypted LUKS volumes at system boot), or still rely on a remote console?
And if you've restricted your unlock key differently or run into an error that isn't covered here, feel free to paste your config or terminal output in the comments so others can learn from it too.