Knowledge Work Plugins: Handle Incidents and Runbooks in Claude Code
In this article, install Knowledge Work Plugins with the claude plugin command so Claude Code can triage incidents and write runbooks on Linux.

You keep pasting terminal errors into a browser chat and re-explaining your servers every single time. Here's how to install Claude Code, add Anthropic's Knowledge Work Plugins, and run incident and runbook workflows without leaving your shell.
If you use an AI assistant for server work, you have probably noticed that moving between the terminal and a browser is only part of the hassle.
Even when the answers are good, the format changes from one session to the next, so your incident notes and runbooks never look quite the same twice, and you end up describing your setup again every time you start a new chat.
Anthropic's knowledge-work-plugins repository is designed to solve this problem. It is a collection of ready-made workflows, packaged as plugins, that teach Claude how to handle specific kinds of work such as incident response, code review, or writing runbooks.
The plugins were built for Anthropic's Claude Cowork desktop app, but they also work in Claude Code, which is Anthropic's command-line tool that runs directly in your terminal.
The repository has more than 25,000+ stars on GitHub and is released under the Apache-2.0 license.
Some plugins can also connect to external tools such as GitHub, Jira, Slack, or Datadog using the Model Context Protocol (MCP), an open standard that lets AI tools talk to other services.
These connections are optional, because every workflow also works on its own when you paste in logs or point Claude at local files.
How Knowledge Work Plugins Work
A plugin is simply a folder of plain text files written in Markdown and JSON, so when you start a Claude Code session, it reads these files to learn the workflows the plugin provides.
Every plugin in the repository uses the same layout:
plugin-name/
├── .claude-plugin/plugin.json   # Manifest: name, version, description
├── .mcp.json                    # MCP server connections (connectors)
├── commands/                    # Slash commands you run explicitly
└── skills/
    └── <skill-name>/SKILL.md    # Workflow instructions Claude loads when relevant
The most important part is the skills directory, where each skill is a SKILL.md file that describes one workflow step by step, and it begins with a short header containing the skill's name and a one-line description.
Claude reads only these short descriptions when the session starts, and it loads the full instructions later when your request matches one of them, which keeps Claude's working memory free for your actual task.
You can also run any skill yourself as a slash command, which is a command you type inside a Claude Code session starting with a forward slash, such as /engineering:incident-response.
Plugins are distributed through a marketplace, which is just a Git repository containing a catalog file named .claude-plugin/marketplace.json.
When you add a marketplace, Claude Code clones that repository to your machine and installs plugins from the local copy.
You will also notice that skill files refer to tools by category rather than by product name.
For example, a skill might mention your "source control" tool instead of GitHub specifically, so the same plugin works whether your team uses GitHub, GitLab, or no connected tool at all.
For Linux administrators, the two most useful plugins are engineering, which covers incident response, debugging, code review, and deployment checklists, and operations, which covers runbooks, change requests, capacity planning, and process documentation.
Prerequisites
Before you begin, make sure you have the following:
- Ubuntu, Debian, Fedora, or Rocky Linux / RHEL / AlmaLinux on an x64 or ARM64 machine, with at least 4 GB of RAM.
- The
curlandgitpackages, since the installer is downloaded with curl and the plugin marketplace is cloned with git. - A paid Claude plan or Anthropic Console account with API billing is required. Claude Code also supports Amazon Bedrock, Google Cloud, and Microsoft Foundry.
You don't need Node.js, because the official installer provides a self-contained binary.
Install Claude Code with Knowledge Work Plugins
Let's start by installing the two small dependencies.
On Ubuntu and Debian:
sudo apt update
sudo apt install -y curl git
On Rocky Linux, RHEL, AlmaLinux, and Fedora:
sudo dnf install -y curl gitNext, run the official installer as your regular user. Avoid running it with sudo, because a root-owned installation prevents Claude Code from updating itself later.
curl -fsSL https://claude.ai/install.sh | bashOnce the installer finishes, open a new terminal so your shell picks up the new path, and then check the installed version:
claude --versionOutput:
2.1.282 (Claude Code)Your version number will be different, since Claude Code is updated frequently. If you see bash: claude: command not found instead, it means the ~/.local/bin directory where the installer places the binary is not in your PATH.
This is common on minimal server installations, and you can fix it by adding the directory to your ~/.bashrc file:
echo 'export PATH="$HOME/.local/bin:$PATH"' >> ~/.bashrc
source ~/.bashrc
Now run claude once to sign in to your account. On a desktop, it opens your browser, and on a headless server, it prints a URL that you can open on your laptop before pasting the login code back into the terminal.
Add the Marketplace and Install Plugins
With Claude Code ready, register Anthropic's plugin marketplace and install the engineering and operations plugins.
The install command uses the format plugin-name@marketplace-name:
claude plugin marketplace add anthropics/knowledge-work-plugins
claude plugin install engineering@knowledge-work-plugins
claude plugin install operations@knowledge-work-plugins
By default, these plugins are installed for your user account and are available in every directory.
If you want to share a plugin with everyone who works in a particular repository, such as your team's Ansible repository, run the install command inside that repository with the --scope project option.
To confirm that both plugins are installed and enabled, list them:
claude plugin listOutput:
  ❯ engineering@knowledge-work-plugins
    Version: 1.2.0
    Scope: user
    Status: ✔ enabled

  ❯ operations@knowledge-work-plugins
    Version: 1.3.0
    Scope: user
    Status: ✔ enabled
The exact output format can vary between Claude Code releases, but you should see both plugins with their status set to enabled.
If you had a Claude Code session open while installing the plugins, run /reload-plugins inside that session or restart Claude Code so it picks up the changes.
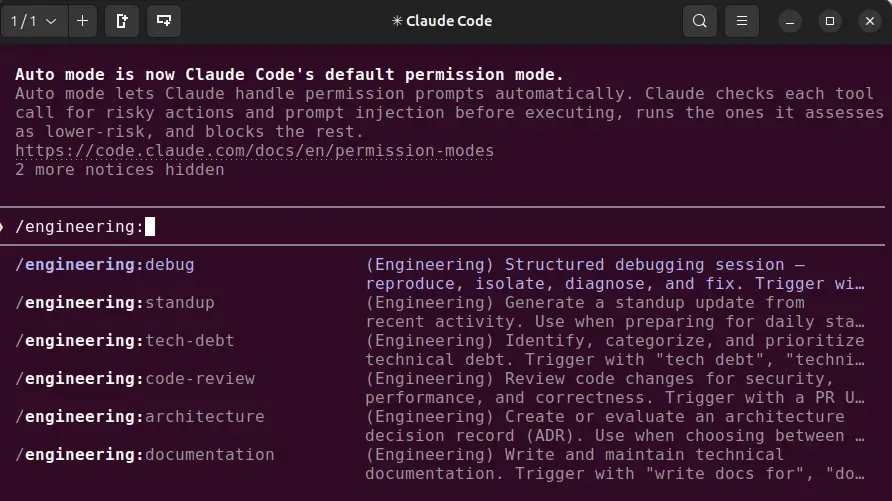
Now start a session and type /engineering: to see the commands provided by the plugin. The plugin name appears before the colon so commands from different plugins do not clash.
For example, you may see commands such as /engineering:incident-response and /operations:runbook. Command names can change between plugin versions, so use the commands shown in your installed version.
If you later try to install a newly added plugin and get a "not found" error, your local marketplace copy may be out of date. Refresh it with:
claude plugin marketplace update knowledge-work-pluginsDesktop and Interactive Alternatives
If you prefer menus over command-line options, type /plugin inside a Claude Code session to browse marketplaces and install, disable, or remove plugins interactively.
The same plugins can also be installed through Claude's plugins page, which is useful if some people on your team work in the desktop app while others use the terminal.
Practical Examples of Knowledge Work Plugins for Sysadmins
For the following examples, we will use a small lab on the tecmint.lan domain with servers in the 192.168.56.x range.
Since Claude generates a fresh response each time, the exact output will differ on your system, so we will focus on what a useful result should include rather than showing a fixed transcript.
Example 1: Troubleshoot an Nginx 502 Error Using the Incident Response Skill
Let's say users report that the site on web01.tecmint.lan (192.168.56.11) is returning 502 errors, and the server runs Nginx in front of a PHP-FPM pool. Start Claude Code on web01, or on a jump host that can reach it over SSH, and run:
/engineering:incident-response Nginx on web01.tecmint.lan returns 502 Bad Gateway for all requests since 14:05. Upstream is PHP-FPM on the same host.The skill first assesses the incident and then suggests checks in a sensible order. In this case, you can expect it to check whether the PHP-FPM service is running, confirm that the socket Nginx connects to still exists, and inspect the Nginx error log for messages such as connect() failed.
Claude asks for permission before running commands, so review each command carefully before approving it, especially on a production server.
As you share your findings, Claude can maintain an incident timeline and draft short status updates for your team channel.
Once the issue is resolved, you can ask it to write a postmortem covering the root cause, timeline, and follow-up actions in a consistent structure.
Example 2: Create a Runbook From Your Server's Real Configuration
Runbooks written from memory often contain the wrong paths or options, which only becomes obvious when someone follows them during an emergency.
Since Claude Code can read files on the local system, you can ask it to create a runbook based on the server's actual configuration:
/operations:runbook Renew the Let's Encrypt certificate for tecmint.lan with certbot and reload Nginx. Read /etc/nginx/conf.d/ and /etc/letsencrypt/renewal/ first so paths match this server.The skill produces numbered steps with the required commands, followed by a verification section, rollback procedure, and escalation path for when something goes wrong.
Because it reads the actual Certbot renewal configuration first, it can determine whether the server uses the webroot or standalone method. That small detail is often what makes a copied runbook fail on another server.
Before saving the runbook to your documentation repository, read through it once and verify that each command is appropriate for the server.
Example 3: Customize a Plugin With Your Own Servers and Team Rules
The plugins are designed for a generic environment, so they do not know your hostnames, tools, or team conventions. To customize them, you can add your own environment-specific instructions.
The repository includes a cowork-plugin-management plugin with a customizer skill that can help adapt plugins to your environment:
claude plugin install cowork-plugin-management@knowledge-work-pluginsInside a session, run the customizer and describe your servers and the rules you want Claude to follow:
/cowork-plugin-management:cowork-plugin-customizerYou can also make the changes manually because the skills are plain Markdown files. Clone the repository and open the runbook skill:
git clone https://github.com/anthropics/knowledge-work-plugins.git ~/knowledge-work-plugins
nano ~/knowledge-work-plugins/operations/skills/runbook/SKILL.md
Leave the header at the top of the file unchanged, because Claude uses the description there to decide when the skill should be used. Then add a section describing your environment:
<!-- ~/knowledge-work-plugins/operations/skills/runbook/SKILL.md (appended) -->
## Company Context
- Servers: web01 (192.168.56.11), web02 (192.168.56.12), db01 (192.168.56.21, MariaDB primary).
- Every runbook ends with a Verification section using curl or systemctl status.
- Use sudo for privileged commands. Never log in as root directly.
Replace the hostnames, IP addresses, and rules with those used in your own environment. After saving the file, test the edited plugin for a single session without changing your installed copy:
claude --plugin-dir ~/knowledge-work-plugins/operationsWhen you are happy with the results, push your customized repository to your own Git server and have your team add it as their marketplace.
This keeps your team's runbook rules in Git, where they can be reviewed alongside the rest of your infrastructure code.
Pro Tips: Keep Claude Out of Large Directories
When Claude explores a project, it may read files and directories that are not relevant to your task, including large directories such as node_modules, vendor, or old log archives.
You can restrict access to specific files and directories through the project's .claude/settings.json file:
json
// ~/infra-ansible/.claude/settings.json
{
  "permissions": {
    "deny": [
      "Read(./node_modules/**)",
      "Read(./logs/archive/**)",
      "Read(./.env)",
      "Read(./secrets/**)"
    ]
  }
}
Remove the comment line when you save the file, since JSON does not allow comments. The last two rules are especially useful for protecting sensitive files such as environment files, passwords, and API keys.
Keep in mind that permission rules control Claude Code's access to files, but they should not replace normal secret-management practices.
During long sessions, you can run /compact to summarize the conversation and free up context space. If you use API billing, /cost shows the estimated cost of the current session.
For teams using API accounts, setting spending limits in the Anthropic Console can also help control usage.
Pro Tips: Set Boundaries Before Letting Claude Run Commands
By default, Claude Code asks for your permission before running commands, and this is the safest way to work on servers.
You can go a step further by adding deny rules for destructive commands you never want it to run, such as "Bash(rm -rf:*)" or "Bash(systemctl stop:*)" to the same settings file.
You should also avoid the --dangerously-skip-permissions option on anything other than a disposable virtual machine or container, because it lets Claude run commands without asking.
For additional isolation, Claude Code also provides sandboxing on Linux that uses bubblewrap, a small tool that restricts Claude Code's filesystem and network access, adding another layer of protection when Claude runs commands.
You can install the bubblewrap package with apt or dnf and then enable the sandbox by typing /sandbox inside a session. Confirm sandbox availability and setup on the current release.
Finally, treat plugins with the same care as any other software you install. A skill can instruct Claude to run commands, and the .mcp.json file controls which external services Claude connects to, so read both before installing a plugin from a third-party marketplace.
In your own copy of the repository, you can also remove any services from .mcp.json that your team doesn't use.
Conclusion
In this guide, we installed Claude Code on Linux, added the Knowledge Work Plugins marketplace, and used the engineering and operations plugins to handle an incident and write a runbook without leaving the terminal.
We also customized a skill with our own servers and rules, so Claude follows the same structure and conventions every time we use it.
If you would like to go further with Claude Code on Linux, including writing your own skills, using hooks, and setting up safe workflows for real servers, take a look at the Claude for Linux course.
We'd love to hear how you're using these plugins in your own setup. Do you allow Claude Code to run commands on your production servers, or do you keep it inside a sandbox or a test virtual machine?
If you've customized a skill for your environment, feel free to share your Company Context section in the comments so others can learn from it.
And if you ran into an error while installing a plugin on your distribution, post the full terminal output below, and we'll help you work through it.