Chapter 3: Install n8n Locally with Node.js and npm
In this chapter, you'll install n8n with npm, choose a supported Node.js version, start the editor on localhost, claim a free licence, and fix installation errors.
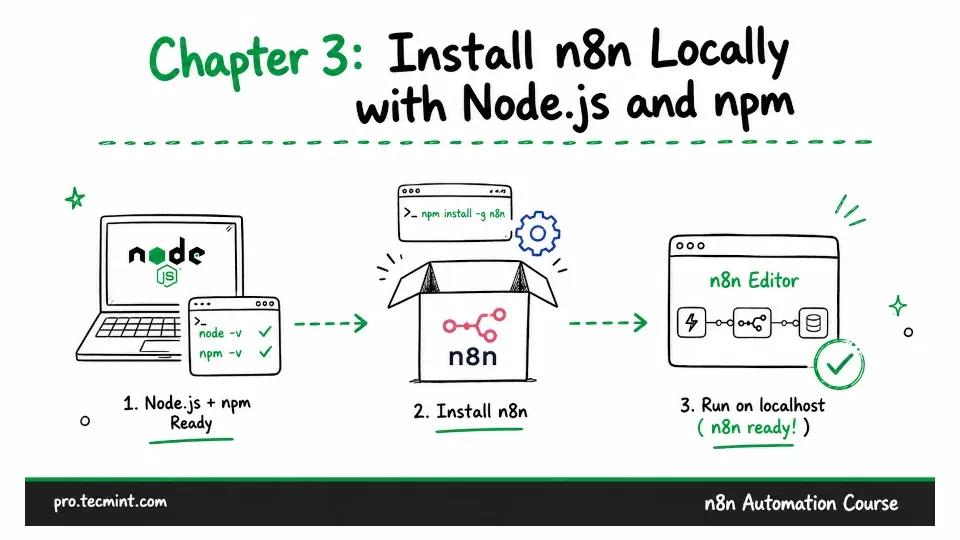
In the previous chapter, you learned what n8n is, how nodes and workflows fit together, and how it compares to Zapier and Make.com. With that, you completed Module 1.
You are now beginning Module 2, where you'll learn four different ways to get n8n running, and this chapter covers the first of them, which is installing n8n directly on your machine using Node.js and npm.
Why We Start With npm Instead of Docker
Docker is the easiest way to install n8n, and we'll cover that in the next chapter. For now, we're starting with npm because it helps you understand what actually gets installed.
Since n8n is a Node.js application, installing it with npm lets you see each part on your system. You'll see the Node.js runtime, where npm installs the application, and the directory where n8n stores your workflows and credentials.
Docker packages all of these together inside a container image, which is convenient once you understand what is inside, but it hides the details while you are still learning them.
There's also a practical reason for doing it this way. Later in the course, if something goes wrong on your server, you'll already know that your credentials are stored in an encrypted database in your home directory, and that the encryption key is saved in a file next to that database.
Installing n8n with npm once helps you understand where everything is and how it works.
The Node.js Version Requirement
Before installing n8n, make sure you're running a supported version of Node.js. At the time of writing, n8n supports Node.js versions 20.19 through 24.x.
If your Node.js version is older than 20.19, n8n won't start because support for Node.js 18 was dropped after it reached its end of life in April 2025. That means if you're using an older version, you'll need to upgrade Node.js before installing n8n.
For this chapter, we'll use Node.js 22, which is a stable LTS release that falls well within n8n's supported range. If you're already running Node.js 24, that's supported as well.
Before installing anything, check whether Node.js is already installed and see which version you're running.
node -v
Output:
v22.23.1
There are three possible outcomes:
- If the version is between 20.19 and 24.x, your Node.js version is supported, so you can skip ahead to installing n8n.
- If the version is outside the supported range, you'll need to replace it with a supported version before installing n8n.
- If the command returns
command not found, that means Node.js isn't installed on your system yet, so you'll need to install it first before continuing.
Installing Node.js
There are two common ways to install Node.js, and the best choice depends on how you plan to use this machine.
- The first option is to install Node.js system-wide via your distribution's package manager, which is the simplest approach if n8n is the only Node.js application you'll run. It also means Node.js is updated along with the rest of your system packages.
- The second option is to use nvm (Node Version Manager). Instead of installing Node.js system-wide, nvm installs it in your home directory. It also lets you install multiple Node.js versions and switch between them whenever you need. If you already work with other Node.js projects, or expect to in the future, nvm is usually the better choice because it avoids version conflicts.
Debian and Ubuntu
On current Debian and Ubuntu releases, you can install Node.js directly from the default repositories.
sudo apt update && sudo apt install -y nodejs npm
After the installation finishes, verify both versions.
node -v && npm -v
Output:
v22.23.1
10.9.8
Ubuntu 26.04 includes Node.js 22, which is well within n8n's supported range, and Debian 13 ships with Node.js 20.19.2, which is also supported, although it sits just above the minimum required version.
If you're using an older release such as Ubuntu 24.04 or Debian 12, the default repositories only provide Node.js 18, which n8n no longer supports. In that case, install Node.js from the NodeSource repository instead.
curl -fsSL https://deb.nodesource.com/setup_22.x | sudo -E bash -
Now install Node.js from the newly added repository.
sudo apt install -y nodejs
Unlike the Debian and Ubuntu packages, the NodeSource package already includes npm, so you don't need to install it separately.
Fedora, RHEL, Rocky Linux, and AlmaLinux
Fedora, RHEL 10, Rocky Linux 10, and AlmaLinux 10 all provide Node.js 22 in their standard repositories, so installing it is straightforward.
sudo dnf install -y nodejs npm
After the installation completes, confirm the installed versions.
node -v && npm -v
Output:
v22.23.1
10.9.8
If you're using RHEL 9, Rocky Linux 9, or AlmaLinux 9, the process is slightly different because these releases use module streams instead of regular packages, so start by listing the available streams.
sudo dnf module list nodejs
Output:
Name      Stream    Profiles                  Summary
nodejs    18        common, development       Javascript runtime
nodejs    20        common, development       Javascript runtime
nodejs    22 [d]    common, development       Javascript runtime
Next, reset any existing Node.js stream, enable the supported stream, and install the packages.
sudo dnf module reset nodejs -y
sudo dnf module enable nodejs:22 -y
sudo dnf install -y nodejs npm
Arch Linux
Arch Linux follows the latest upstream releases; that means the standard nodejs package may be an odd-numbered development release, which n8n doesn't support.
To avoid that, install the long-term support package instead.
sudo pacman -S nodejs-lts-jod npm
The name jod is the codename for the Node.js 22 LTS release.
macOS and Windows
If you're using macOS and already have Homebrew installed, install Node.js 22 with:
brew install node@22
On Windows, download the Long-Term Support (LTS) installer from the Node.js website and accept the default installation options.
The installer includes npm and automatically adds Node.js to your system's PATH, so you can run node and npm from any terminal.
The rest of the commands in this chapter work the same way in PowerShell. The only difference is that Windows doesn't use sudo, so you can simply leave it out.
Installing Node.js with nvm
If you chose to use nvm, install it by running the following command.
curl -o- https://raw.githubusercontent.com/nvm-sh/nvm/v0.40.1/install.sh | bash
After the installation completes, close your terminal and open a new one so your shell loads nvm. Then install Node.js 22.
nvm install 22
When the installation is complete, verify that both Node.js and npm are available.
node -v && npm -v
Output:
v22.23.1
10.9.8
Your version numbers may be different from the examples shown here, as new releases are published regularly. The important thing is that you're running a supported Node.js version, such as 22 or any version between 20.19 and 24.x.
If package managers, repositories, and signing keys are unfamiliar to you, the Ubuntu Handbook covers apt and package management in detail.
Trying n8n Without Installing It
If you'd like to explore n8n before installing it permanently, you can run it with npx, which is included with npm.
npx n8n
This downloads n8n, starts it, and removes it when you're done. Since the files aren't kept on your system, npx downloads everything again each time you run the command.
npx n8n
Need to install the following packages:
[email protected]
Ok to proceed? (y) y
It's a convenient way to try n8n, but it's not suitable for a system where you'll be using it regularly.
Installing n8n with npm
Once you have a supported version of Node.js installed, installing n8n is straightforward.
sudo npm install -g n8n
The -g option installs n8n globally instead of in your current directory. Without -g, npm installs the package inside the current directory by creating a node_modules folder, and the n8n command won't be available system-wide.
When the installation finishes, verify that n8n is installed and check its version.
n8n --version
Output:
2.33.3
Starting n8n for the First Time
Now it's time to start n8n with the following command.
n8n start
Initializing n8n process
n8n ready on ::, port 5678
Migrations in progress, please do NOT stop the process.
Starting migration InitialMigration1588102412422
Finished migration InitialMigration1588102412422
Starting migration WebhookModel1592445003908
Finished migration WebhookModel1592445003908
Starting migration CreateIndexStoppedAt1594825041918
Finished migration CreateIndexStoppedAt1594825041918
Starting migration MakeStoppedAtNullable1607431743769
...
[license SDK] Skipping renewal on init: license cert is not initialized
Registered runner "JS Task Runner" (q-XSQq9nM7ipRZs4sKqpT)
Instance registered
Discovered 4 cluster checks
Recorded version change: (none) -> 2.33.3
Version: 2.33.3
Building workflow dependency index...
Finished building workflow dependency index. Processed 0 draft workflows, 0 published workflows.

Editor is now accessible via:
http://localhost:5678

Press "o" to open in Browser.
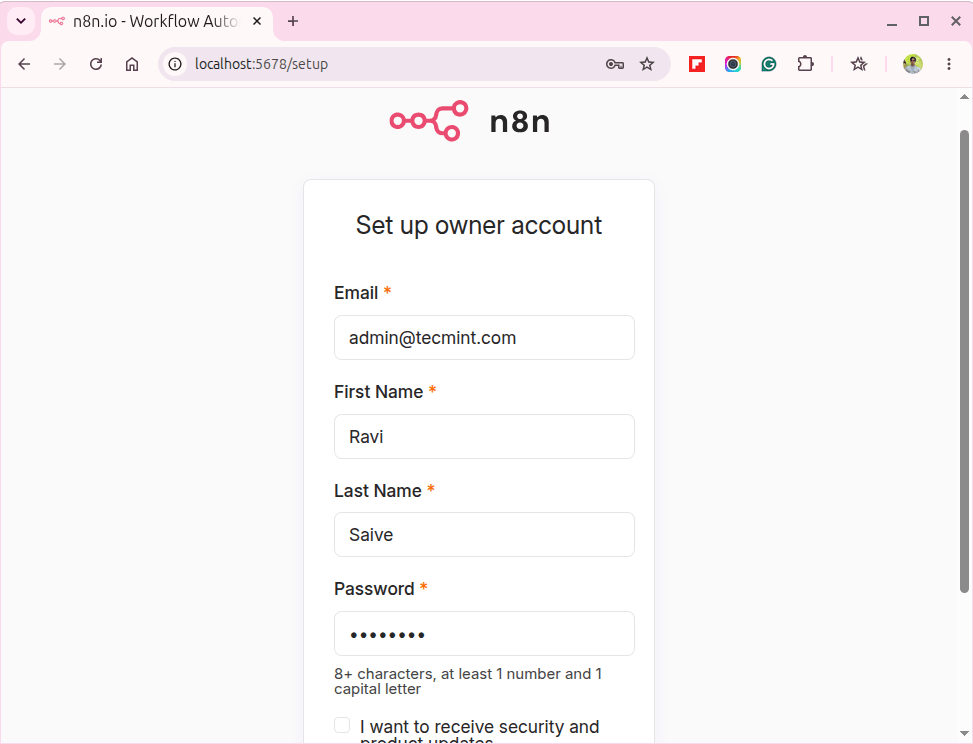
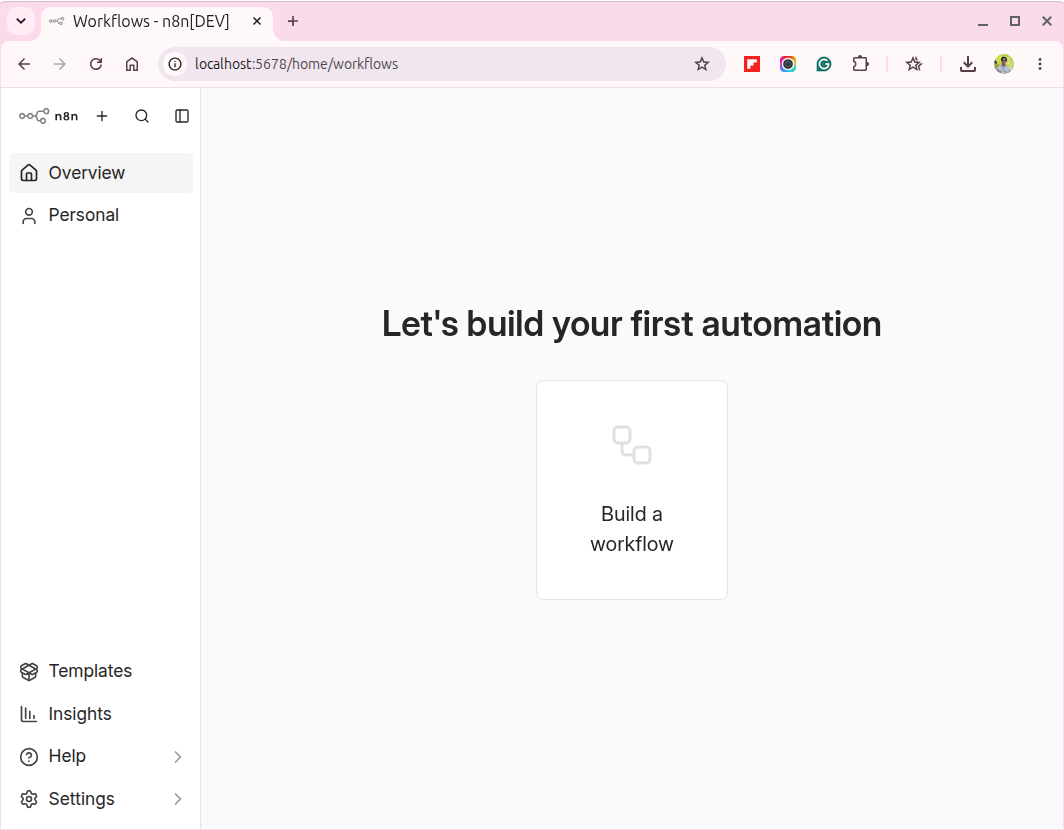
Once n8n starts, open the address shown in your browser. The first time you launch it, you'll be asked to create an owner account, which is the administrator account for your local n8n instance.
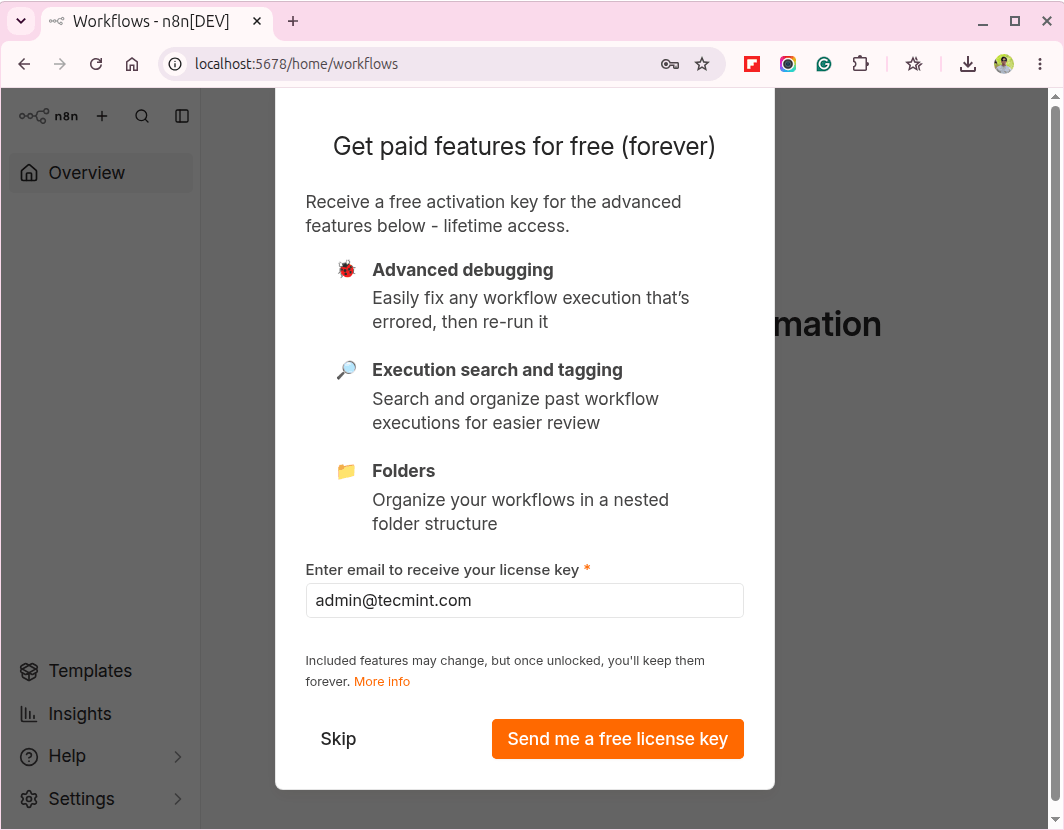
After creating your account, n8n will offer you a free Community Edition license key that unlocks several additional editor features at no cost, so it's worth activating.
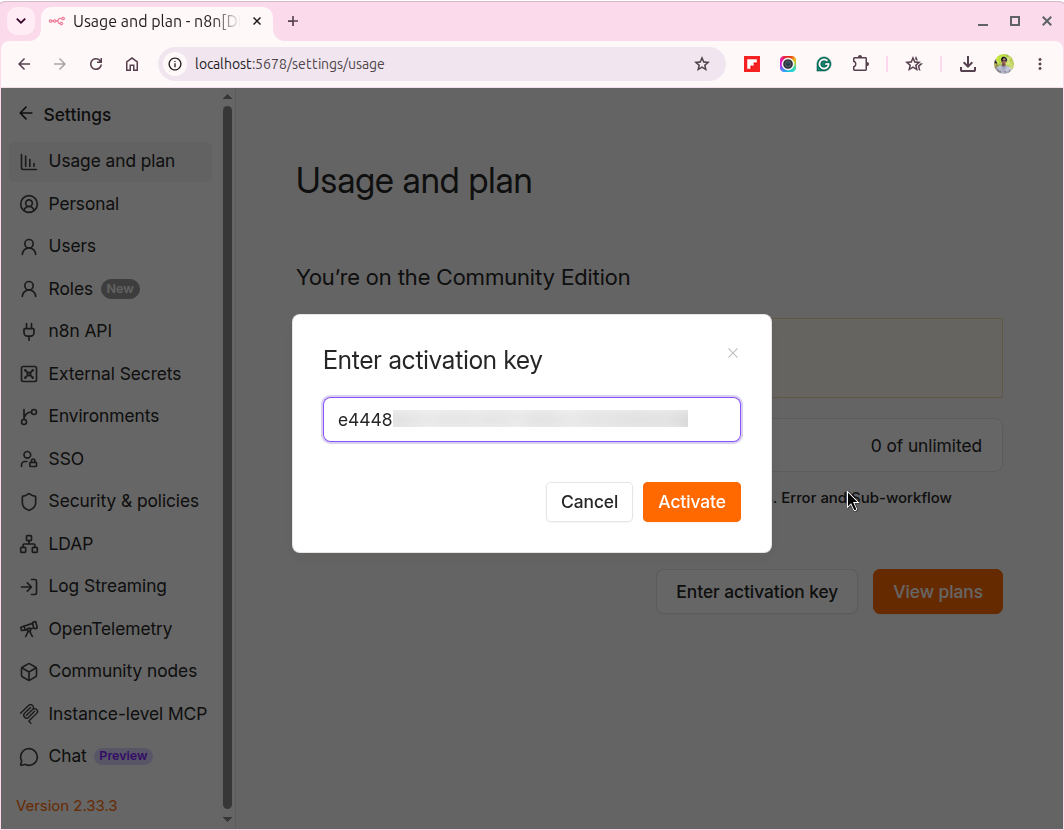
In most cases, you can simply click the activation link in the email, and the license will be applied automatically. If the link doesn't work, which can happen with some email clients, open Settings → Usage and plan, click Enter activation key, and paste the key from the email.
After activation, you'll see an empty workflow canvas; this is where you'll build all of your workflows throughout the rest of the course. We'll explore the editor, canvas, and its panels in detail in Chapter 7.
Before moving on, notice what's happening in the terminal where you started n8n. The process is running in the foreground, which means that the terminal window must remain open while n8n is running.
If you close the terminal or press Ctrl+C, n8n stops immediately, along with any scheduled workflows.
This is one of the limitations of running n8n locally, which we discussed in Chapter 2. In Chapter 6, you'll learn how to run n8n as a background service on a server so it continues running even after you log out.
Where n8n Stores Your Data
There are two locations you should know about, and each has a different purpose.
The first is where n8n itself is installed. If you installed it with npm, you can find the global installation directory with:
npm root -g
Output:
/usr/local/lib/node_modules
If you installed Node.js using nvm, the location will be inside your home directory instead.
/home/you/.nvm/versions/node/v22.18.0/lib/node_modules
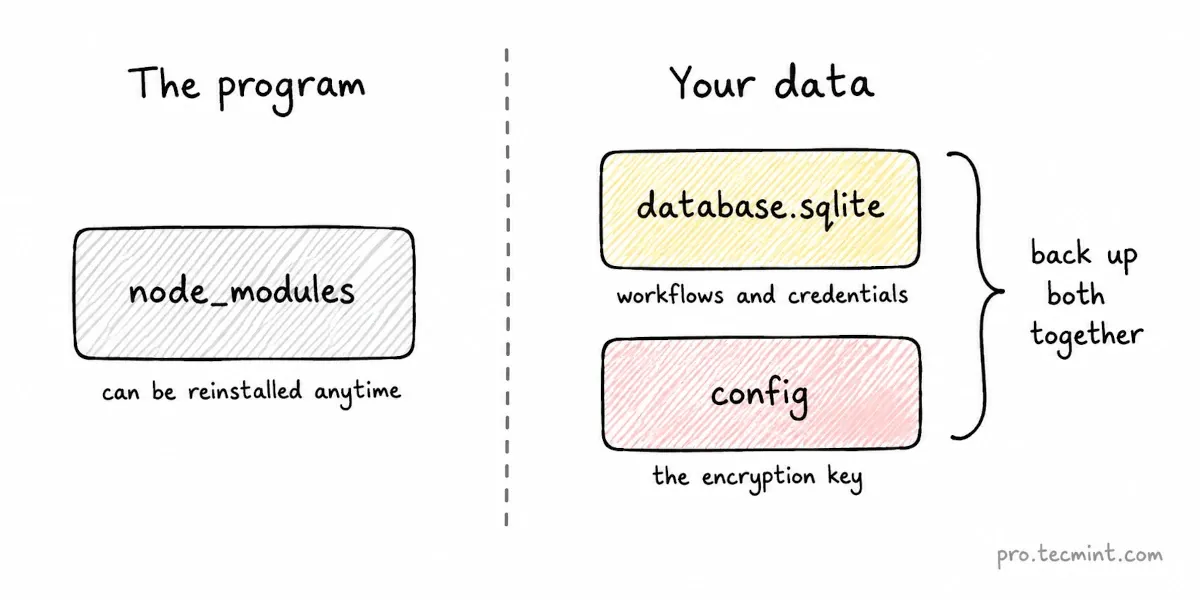
The more important location is the hidden .n8n directory in your home folder, which is where n8n stores your own data.
ls -la ~/.n8n
Output:
total 5560
drwxr-xr-x. 4 ravi ravi     148 Aug  5 11:59 .
drwx------. 6 ravi ravi     173 Aug  5 11:59 ..
-rw-------. 1 ravi ravi      56 Aug  5 11:57 config
-rw-r--r--. 1 ravi ravi 1519616 Aug  5 11:59 database.sqlite
-rw-r--r--. 1 ravi ravi   32768 Aug  5 12:11 database.sqlite-shm
-rw-r--r--. 1 ravi ravi 4136512 Aug  5 12:11 database.sqlite-wal
-rw-r--r--. 1 ravi ravi       0 Aug  5 11:59 n8nEventLog.log
drwxr-xr-x. 2 ravi ravi      26 Aug  5 11:59 nodes
drwxr-xr-x. 2 ravi ravi       6 Aug  5 11:59 storage
The database.sqlite file stores your workflows, saved credentials, and workflow execution history.
The config file stores the encryption key that n8n uses to encrypt your saved credentials.
These two files go together and should always be backed up as a pair. If you restore database.sqlite without the matching config file, n8n can still load your workflows, but it won't be able to decrypt the saved credentials inside them.
The simplest and safest approach is to back up the entire .n8n directory, which will be covered in detail in Chapter 37.
Startup n8n Options You'll Need
n8n supports many environment variables, but there are three you'll find useful right from the beginning.
Running n8n on a Different Port
By default, n8n listens on port 5678. If another application is already using that port, you can choose a different one.
N8N_PORT=5679 n8n start
After starting n8n this way, open it in your browser using the new port, for example:
http://localhost:5679
Storing Data in a Different Location
By default, n8n stores all of its data in the .n8n directory inside your home folder. If you'd rather keep the data somewhere else, set the N8N_USER_FOLDER environment variable when starting n8n.
N8N_USER_FOLDER=/opt/n8n-data n8n start
From that point on, n8n stores its database, configuration, and other files in the directory you specify instead of ~/.n8n.
Accessing n8n from Another Device
If you want to open the n8n editor from another device on your network, such as a laptop reaching an instance running on a desktop, you will need to disable the secure cookie setting.
N8N_SECURE_COOKIE=false n8n start
This last option is a security setting, so it is worth understanding what it does before you use it.
By default, n8n marks its session cookie as secure, which tells the browser to send that cookie only over HTTPS connections. When you reach a local instance by its IP address, the connection is plain HTTP, so the browser refuses to send the cookie and the login silently fails.
Setting this variable to false allows the cookie to be sent over HTTP. You should only do this on a network you trust, and never on an instance that is reachable from the internet, because it would expose your session to anyone able to read the traffic.
Updating and Removing n8n
n8n releases new versions frequently, so you'll probably update your installation from time to time.
To upgrade to the latest available version, run:
npm update -g n8n
If you want to install a specific version instead, either to stay on a known release or to roll back after an update, specify the version number when installing.
npm install -g [email protected]
Before updating an n8n instance that you rely on, it's a good idea to read the release notes first. Since new releases come out regularly, checking for changes ahead of time can help you avoid unexpected surprises after the upgrade.
If you no longer need n8n, remove the global package with:
npm uninstall -g n8n
This removes the n8n application, but it doesn't delete your data. The ~/.n8n directory is left untouched, so your workflows, credentials, and configuration remain on disk.
If you install n8n again later, it will use the existing data in that directory.
If you want to completely remove n8n, including all workflows, credentials, and configuration, you'll also need to delete the ~/.n8n directory yourself.
Troubleshooting Common n8n Installation Errors
Most n8n installation problems come down to a handful of common issues. Once you know what causes them, they're usually straightforward to fix.
1. Unsupported Node.js Version
The following error usually happens for one of two reasons:
Your Node.js version 18.19.1 is currently not supported by n8n.
Please use a Node.js version between 20.19 and 24.x
- You're using an older operating system whose repositories still provide Node.js 18.
- You installed the latest version from the Node.js website, but it turned out to be an odd-numbered release that's outside n8n's supported range.
These days, the second situation is becoming more common, because most current Linux distributions provide a supported Node.js version, while the latest release on the Node.js website isn't always an LTS release.
To fix the problem, install a supported version of Node.js and then reinstall n8n.
nvm install 22 && nvm use 22
npm uninstall -g n8n && npm install n8n -g
The easiest way to avoid this problem is to check your Node.js version before installing n8n.
node -v
2. Permission Denied During Installation
The following error means npm is trying to write to a system directory that's owned by root, while you're running the installation as a normal user.
npm error code EACCES
npm error syscall mkdir
npm error path /usr/lib/node_modules/n8n
npm error errno -13
Using sudo may seem like the obvious solution, and it usually works. However, it can create permission problems later because the application is installed as root, while n8n stores its data in your home directory under your own user account.
A better solution is to use nvm, which installs Node.js and global npm packages entirely inside your home directory.
If you don't want to use nvm, configure npm to use a directory that your user owns.
mkdir -p ~/.npm-global
npm config set prefix ~/.npm-global
After that, add ~/.npm-global/bin to your PATH, open a new terminal, and install n8n again.
3. Port Already in Use
The following error means another application is already using port 5678.
Error: listen EADDRINUSE: address already in use 0.0.0.0:5678
In many cases, it's another n8n process that was left running, or a Docker container from a previous test.
To see what's using the port, run:
sudo lsof -i :5678
Output:
COMMAND   PID  USER   FD   TYPE DEVICE SIZE/OFF NODE NAME
node    31204   you   22u  IPv4 198234      0t0  TCP *:5678 (LISTEN)
You can stop the process that's using the port, or simply start n8n on another port by setting the N8N_PORT environment variable.
4. n8n command not found
If the installation completed successfully but the n8n command isn't recognized, npm most likely installed the executable into a directory that's not in your PATH.
n8n: command not found
This commonly happens after changing npm's global installation directory or immediately after installing nvm, before opening a new terminal.
First, check where npm installs global executables.
npm bin -g
If that directory isn't listed in your PATH, add it to your shell profile, then open a new terminal window and try the command again.
5. Installation Stops with a Build Error
On systems with very little memory, n8n may fail while compiling its native modules during installation.
npm error code 1
npm error gyp ERR! build error
Although the error mentions a build failure, the real problem is often that the system ran out of RAM and the kernel stopped the compiler.
This is most common on virtual machines or cloud instances with less than 1 GB of memory.
You can solve the problem by adding swap space or by installing n8n with Docker, which uses prebuilt binaries and doesn't need to compile anything during installation.
What's Next
You now have a working n8n installation on your own machine. Along the way, you learned which Node.js versions n8n supports, how to install it with npm, where it stores its data, and how to troubleshoot the most common installation problems.
In Chapter 4, you'll install n8n using Docker instead of npm. Since the Docker image already includes a supported version of Node.js, you won't have to worry about installing or managing Node.js yourself.
The Docker setup you build in the next chapter also prepares you for Chapter 6, where you'll deploy n8n on a Linux server with Nginx, HTTPS, and SSL.