Chapter #13: Getting Started with SELinux
In this chapter, we explore SELinux basics, including modes, contexts, and booleans, to help you control system access and secure services like SSH and Apache.
In this course, we have explored in detail at least two access control methods: standard ugo/rwx permissions and access control lists. Although necessary as first-level permissions and access control mechanisms, they have some limitations that are addressed by Security Enhanced Linux (aka SELinux for short).
One of such limitations is that a user can expose a file or directory to a security breach through a poorly elaborated chmod command and thus cause an unexpected propagation of access rights.
As a result, any process started by that user can do as it pleases with the files owned by the user, where finally, a malicious or otherwise compromised software can achieve root-level access to the entire system.
With those limitations in mind, the United States National Security Agency (NSA) first devised SELinux, a flexible mandatory access control method, to restrict the ability of processes to access or perform other operations on system objects (such as files, directories, network ports, etc) to the least permission model, which can be modified later as needed. In a few words, each element of the system is given only the access required to function.
In RHEL, SELinux is incorporated into the kernel itself and is enabled in Enforcing mode by default. In this chapter, we will explain briefly the basic concepts associated with SELinux and its operation.
SELinux Modes
SELinux can operate in three different ways:
- Enforcing: SELinux denies access based on SELinux policy rules, a set of guidelines that control the security engine.
- Permissive: SELinux does not deny access, but denials are logged for actions that would have been denied if running in enforcing mode.
- Disabled (self-explanatory).
The getenforce command displays the current mode of SELinux, whereas setenforce (followed by a 1 or a 0) is used to change the mode to Enforcing or Permissive, respectively, during the current session only.
In order to achieve persistence across logouts and reboots, you will need to edit the /etc/selinux/config file and set the SELINUX variable to either enforcing, permissive, or disabled (see Fig. 1):
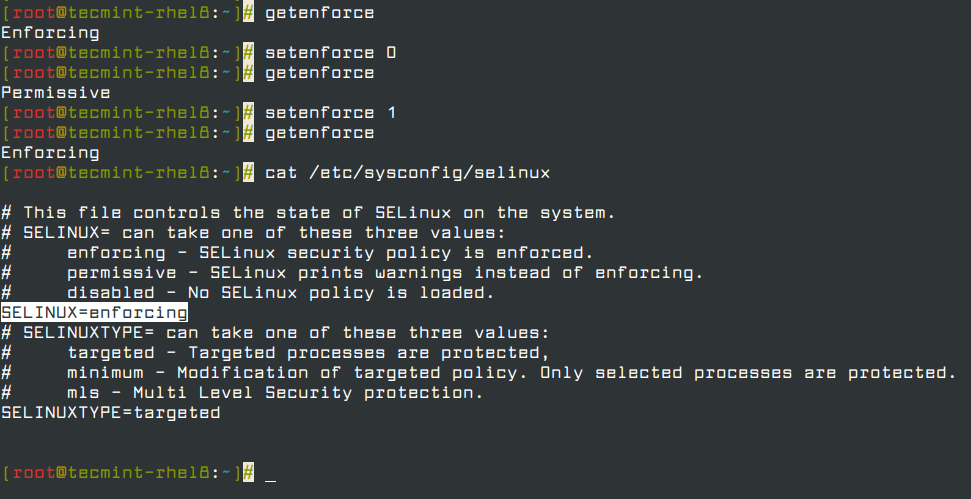
Typically, you will use setenforce to toggle between SELinux modes (enforcing to permissive and back) as a first troubleshooting step.
If SELinux is currently set to enforcing while you’re experiencing a certain problem, and the same goes away when you set it to permissive, you can be confident you’re looking at a SELinux permissions issue.
SELinux Contexts
A SELinux context consists of an access control environment where decisions are made based on SELinux user, role, and type (and optionally a level):
- A SELinux user complements a regular Linux user account by mapping it to a SELinux user account, which in turn is used in the SELinux context for processes in that session, in order to explicitly define their allowed roles and levels.
- The concept of role acts as an intermediary between domains and SELinux users in that it defines which process domains and file types can be accessed. This will shield your system against vulnerability to privilege escalation attacks.
- A type defines an SELinux file type or an SELinux process domain. Under normal circumstances, processes are prevented from accessing files that other processes use, and from accessing other processes; thus, access is only allowed if a specific SELinux policy rule exists that allows it.
Let’s see how all of that works through the following examples.