Chapter #6: How to Set Up Software RAID and Backups on Linux
In this chapter, you'll learn how to configure software RAID using mdadm, monitor array health, and create reliable full-system and file-level backups using tools like dd, tar, and rsync.
The technology known as Redundant Array of Independent Disks (RAID) is a storage solution that combines multiple hard disks into a single logical unit to provide redundancy of data and/or improve performance in read / write operations to disk.
However, the actual fault-tolerance and disk I/O performance lean on how the hard disks are set up to form the disk array. Depending on the available devices and the fault tolerance/performance needs, different RAID levels are defined.
Our tool of choice for creating, assembling, managing, and monitoring our software RAIDs is called mdadm (short for multiple disks admin).
aptitude update && aptitude install mdadm # Debian and derivatives
yum update && yum install mdadm # RHEL based distros
Assembling Partitions as RAID Devices
The process of assembling existing partitions as RAID devices consists of the following steps:
1. Create the RAID Array
Create the array using mdadm. If one of the partitions has been formatted previously or has been a part of another RAID array previously, you will be prompted to confirm the creation of the new array.
Assuming you have taken the necessary precautions to avoid losing important data that may have resided in them, you can safely type y and press Enter.
If you're unsure about the state of a disk, use the following command to check for existing RAID metadata before creating the array.
mdadm --examine /dev/sdX1
2. Check RAID Array Creation Status
In order to check the array creation status, you will use the following commands, regardless of the RAID type.
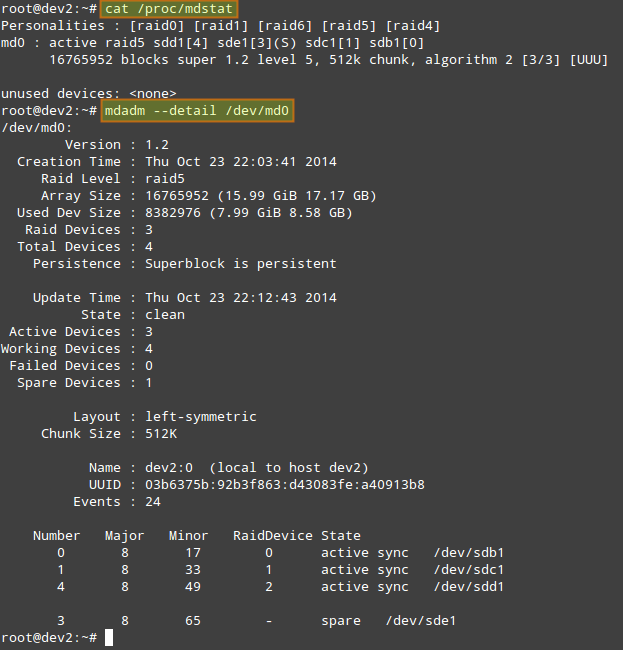
These are just as valid as when we are creating a RAID0 (as shown above), or when you are in the process of setting up a RAID5, as shown in the image below.
cat /proc/mdstat
or more detailed with
mdadm --detail /dev/md0
3. Format the RAID Device
Format the device with a filesystem as per your needs/requirements, as explained in Chapter 4 (“Partitioning storage devices, formatting filesystems, and configuring swap partitions”) of this series.
🔹 Common filesystems used here include ext4, xfs, or btrfs, depending on your performance and feature needs.
4. Enable RAID Monitoring
Instruct the monitoring service to “keep an eye” on the array. Add the output of:
mdadm --detail --scan
to /etc/mdadm/mdadm.conf (Debian and derivatives) or /etc/mdadm.conf (RHEL), like so:
mdadm --assemble --scan # Assemble the array

5. Configure Auto-Start on Boot
To ensure the service starts on system boot, run the following commands as root:
Debian and derivatives, though it should start running on boot by default.
update-rc.d mdadm defaults
Edit the /etc/default/mdadm file and add the following line:
AUTOSTART=true
On RHEL (systemd-based):
systemctl start mdmonitor
systemctl enable mdmonitor
🔹 Also, ensure that /etc/mdadm.conf exists and contains valid array definitions for auto-start to work correctly.