Chapter #5: Mount and Unmount Filesystems in Linux
In this chapter, you'll learn how to mount and unmount local filesystems in Linux using the mount and umount commands, including how to troubleshoot common errors like "device is busy".
Once a disk has been partitioned, Linux needs some way to access the data on the partitions. Unlike DOS or Windows (where this is done by assigning a drive letter to each partition), Linux uses a unified directory tree where each partition is mounted at a mount point in that tree.
A mount point is a directory that is used as a way to access the filesystem on the partition, and mounting the filesystem is the process of associating a certain filesystem (a partition, for example) with a specific directory in the directory tree.
In other words, the first step in managing a storage device is attaching the device to the file system tree, which can be accomplished on a one-time basis by using tools such as mount (and then unmounted with umount) or persistently across reboots by editing the /etc/fstab file.
Note: You must format the partition with a supported Linux filesystem (likeext4,xfs, etc.) before mounting it, using tools likemkfs.
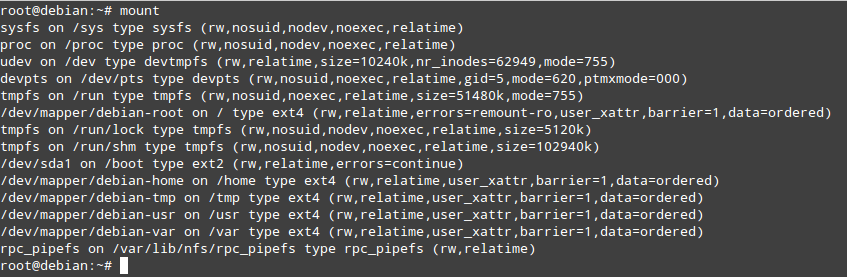
The mount command (without any options or arguments) shows the currently mounted filesystems:
mount
In addition, mount is used to mount filesystems into the filesystem tree and its standard syntax is as follows:
mount -t type device dir -o options
This command instructs the kernel to mount the filesystem found on device (a partition, for example, that has been formatted with a filesystem type) at the directory dir, using all options. In this form, mount does not look in /etc/fstab for instructions.
If only a directory or device is specified, for example:
mount /dir -o options
Or
mount device -o options
mount tries to find a mount point, and if it can’t find any, then searches for a device (both cases in the /etc/fstab file), and finally attempts to complete the mount operation (which usually succeeds, except for the case when either the directory or the device is already being used, or when the user invoking mount is not root).
Tip: To check available partitions and filesystems, you can uselsblk,blkid, orfdisk -l.
You will notice that every line in the output of mount has the following format:
Device on directory type (options)
For Example,
/dev/mapper/debian-home on /home type ext4 (rw,relatime,user_xattr,barrier=1,data=ordered)
The /dev/mapper/debian-home is mounted on /home, which has been formatted as ext4, with the following options: rw,relatime,user_xattr,barrier=1,data=ordered.
Mount Options
Most frequently used mount options include:
- async: allows asynchronous I/O operations on the file system being mounted.
- auto: marks the file system as enabled to be mounted automatically using
mount -a. It is the opposite ofnoauto. - defaults: this option is an alias for
async,auto,dev,exec,nouser,rw,suid. Note that multiple options must be separated by a comma without any spaces.
Caution: If by accident you type a space between options, mount will interpret the subsequent text string as another argument.- loop: Mounts an image (an
.isofile, for example) as a loop device. This option can be used to simulate the presence of the disk’s contents in an optical media reader. - noexec: prevents the execution of executable files on the particular filesystem. It is the opposite of
exec. - nouser: prevents any users (other than root) to mount and unmount the filesystem. It is the opposite of
user. - remount: mounts the filesystem again in case it is already mounted.
- ro: mounts the filesystem as read-only.
- rw: mounts the file system with read and write capabilities.
- relatime: makes access time to files be updated only if
atimeis earlier thanmtime. - user_xattr: allow users to set and remove extended filesystem attributes.
Note: You can view available mount options for a filesystem type using:
man mount
For example, in order to mount a device with ro and noexec options, you will need to do:
mount -t ext4 /dev/sdg1 /mnt -o ro,noexec
In this case, we can see that attempts to write a file to or to run a binary file located inside our mounting point fail with corresponding error messages:
touch /mnt/myfile
/mnt/bin/echo “Hi there”

To mount a device with default options:
mount -t ext4 /dev/sdg1 /mnt -o defaults
In the following scenario, we will try to write a file to our newly mounted device and run an executable file located within its filesystem tree using the same commands as in the previous example:
touch /mnt/myfile
/mnt/bin/echo “Hi there”
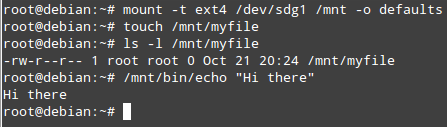
In this last case, it works perfectly.
Unmounting Devices
Unmounting a device (with the umount command) means finishing writing all the remaining “on transit” data so that it can be safely removed.